
이번에 동아리에서 기존 Nest로 작성된 Account-Server를 Spring+Kotlin으로 변경하는 프로젝트(같은 스터디)를 진행하게 됐습니다.
저는 현재 이 중에서도 특히 인증과 인가 담당한 파트를 전반적으로 담당하고 있습니다.
왜 스프링인가?
시작에 앞서 간략하게 나마 스프링으로 전환하려는 이유를 서술하겠습니다.
1. 유지보수 가능한 개발자가 많다.
저희 동아리의 메인 서버가 스프링+코틀린으로 작성된 만큼 스프링을 다룰 개발자가 많으며, 동시에 구인하기에도 용이합니다.
2. Nest를 쓸만큼 다중 요청이 많지 않다.
싱글 쓰레드인 Nest는 비동기 I/O 모델은 분명 I/O bound 작업에서 강한 만큼, I/O 작업이 주를 이루는 어카운트 서버 (WAS내 복잡한 연산 X)라는 점에서 스프링보다 장점을 가지고 있습니다.
다만 현 시점, 저희 앱의 트래픽 수준에서 스프링의 장점을 차치하고 Nest를 사용할 명분이 부족하다고 생각이 듭니다.
왜 Spring Security 기술을 쓰는가?
사실 Jwt라이브러리와 필터만 이용한 인증과 인가를 지난 글에서 구현했습니다.
다만 검증된 보안 프레임워크를 사용하는 것이 보안상 안전하고, 추후 유지보수와 확장성에서의 강점 때문에 실제 환경에선 Spring Security를 사용했습니다.
Spring Security 뜯어보기
러닝커브가 좀 있었습니다.
Spring Security를 처음 의존성에 추가하면, 다음과 같은 부트스트랩 로그인 페이지와 마주합니다.
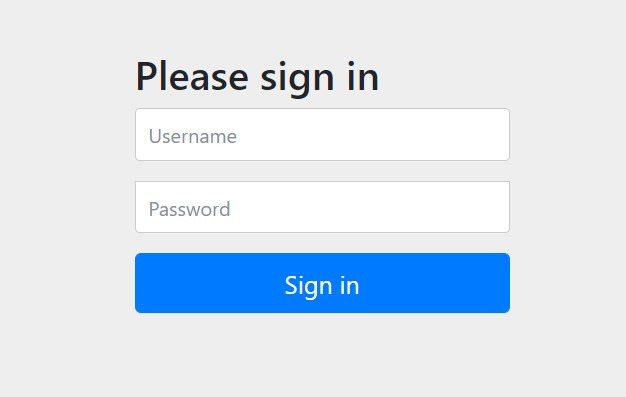
즉, Spring Security에선 username과 password를 통한 인증 + ROLE_** 을 이용한 인가가 기본으로 설정돼 있습니다.
하지만 저희 어카운트 서비스의 경우, JWT 토큰을 이용한 인증과 인가를 적용하고 있었습니다.
이제 공식 문서와 코드를 뜯어 봐야할 이유가 생겼습니다.
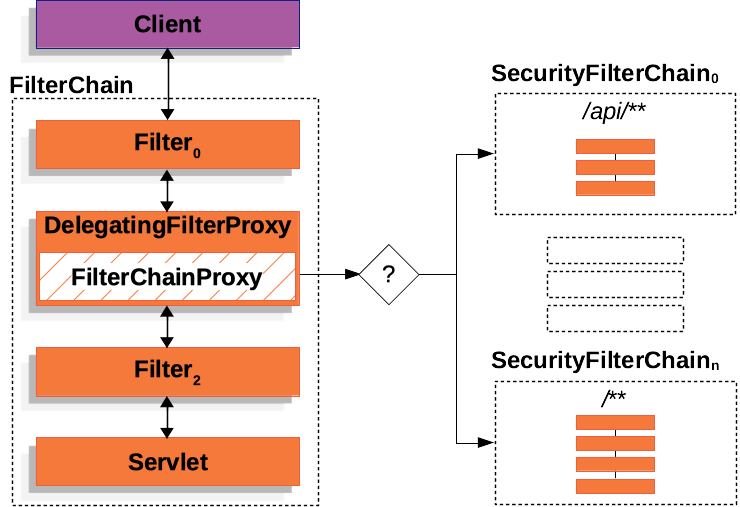
Security는 표준 Servlet 필터에 DelegatinFilterProxy를 끼워넣는 방식으로 설계됐습니다.
그리고 이 분리된 FilterChain은 다음과 같이 커스텀으로 구현이 가능합니다
@Configuration
@EnableWebSecurity
class SecurityConfig {

    @Bean
    fun filterChain(http: HttpSecurity): SecurityFilterChain {
        http {
            csrf { }
            authorizeHttpRequests {
                authorize(anyRequest, authenticated)
            }
            httpBasic { }
            formLogin { }
        }
        return http.build()
    }

}
다음 코드는 로깅을 통해 알게된 DefaultSecurityFilterChain 초기 순서 입니다.
logging:
  level:
    org:
      springframework:
security: Trace로깅 설정은 다음과 같이 작성해주시면 됩니다.
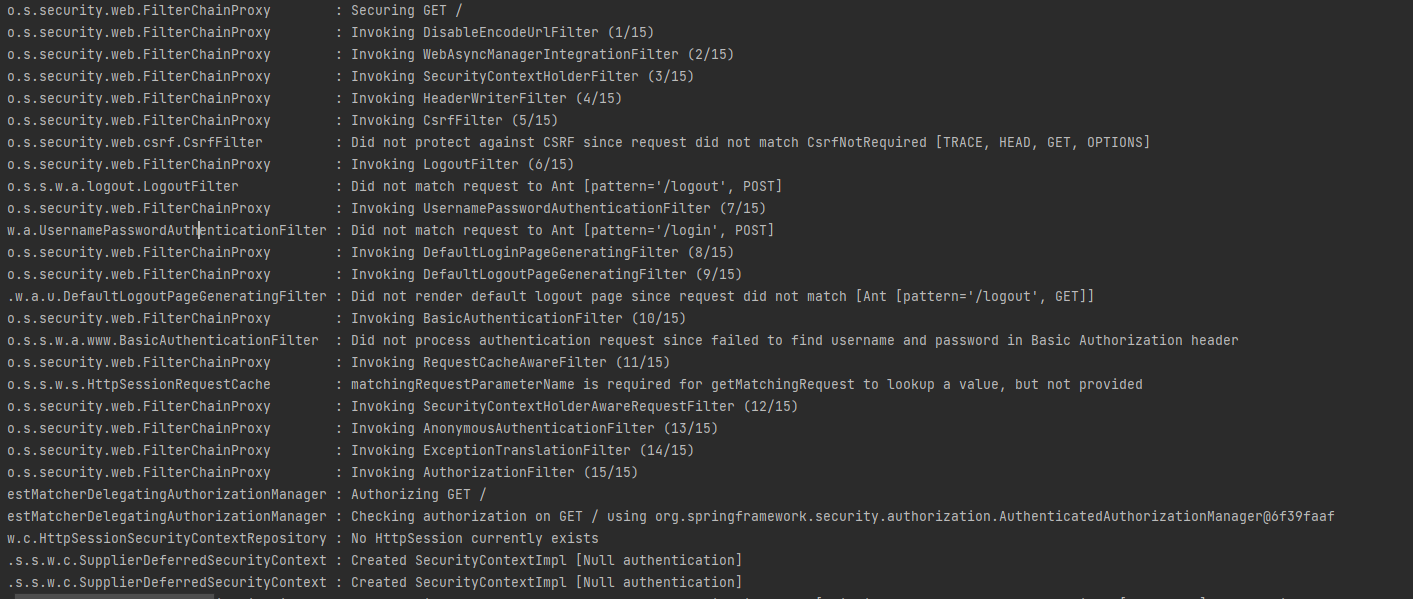
기본 필터 체인 중에서 제가 생각하는 중요한 필터들만 설명하겠습니다.
3. SecurityContextHolderFilter --> 각 요청의 독립된 ContextHolder 생성
7. UsernamePasswordAuthenticationFilter --> POST /login일 경우 Username, Password 인증
10. BasicAuthenticationFilter --> 헤더를 확인해, Basic Authrization이 존재하면 인증
15. AuthorizationFilter --> 앞선 과정에서 얻은 인가를 확인해 요청하는 도메인과 비교하는 필터
이 과정에서 만약 로그인을 시도 한다.

인증 정보를 앞서 설명한 ContextHolder에 담고, 추가적으로 세션 정보에도 따로 담습니다.
(이후 요청에서 로그인을 재요청 하지 않기 위해)
이제 제가 해야할 일은 중간에 JWT Token authentication 필터를 주입함으로써,
Security Context Holder에 인가 권한이 포함된 인증 객체를 주입하는 게 최종 목표입니다.
이제 이 필터를 우리가 복잡하게 만들 필요 없이, Security에서 제공해주는 의존성을 추가하고 Security 설정을 바꿔보겠습니다.
OAuth2 Resource Server
의존성 추가
implementation("org.springframework.boot:spring-boot-starter-oauth2-resource-server")
기본적인 filterChain 등록
@Configuration
class SecurityConfig {

    @Bean
    fun filterChain(http:HttpSecurity): SecurityFilterChain {
        http {
            authorizeRequests {
                authorize(anyRequest, authenticated)
            }
            oauth2ResourceServer {
                jwt { }
            }
        }
        return http.build()
    }

    @Bean
    fun jwtDecoder(): JwtDecoder {
        val algorithm: MacAlgorithm = MacAlgorithm.HS256
        val secretKey = "spring"
        return NimbusJwtDecoder.withSecretKey(SecretKeySpec(secretKey.toByteArray(), algorithm.getName()))
            .macAlgorithm(algorithm)
            .build()
    }
}
OauthResourceServer를 필터 체인에 새롭게 추가한 이후, Security Filter 순서의 차이
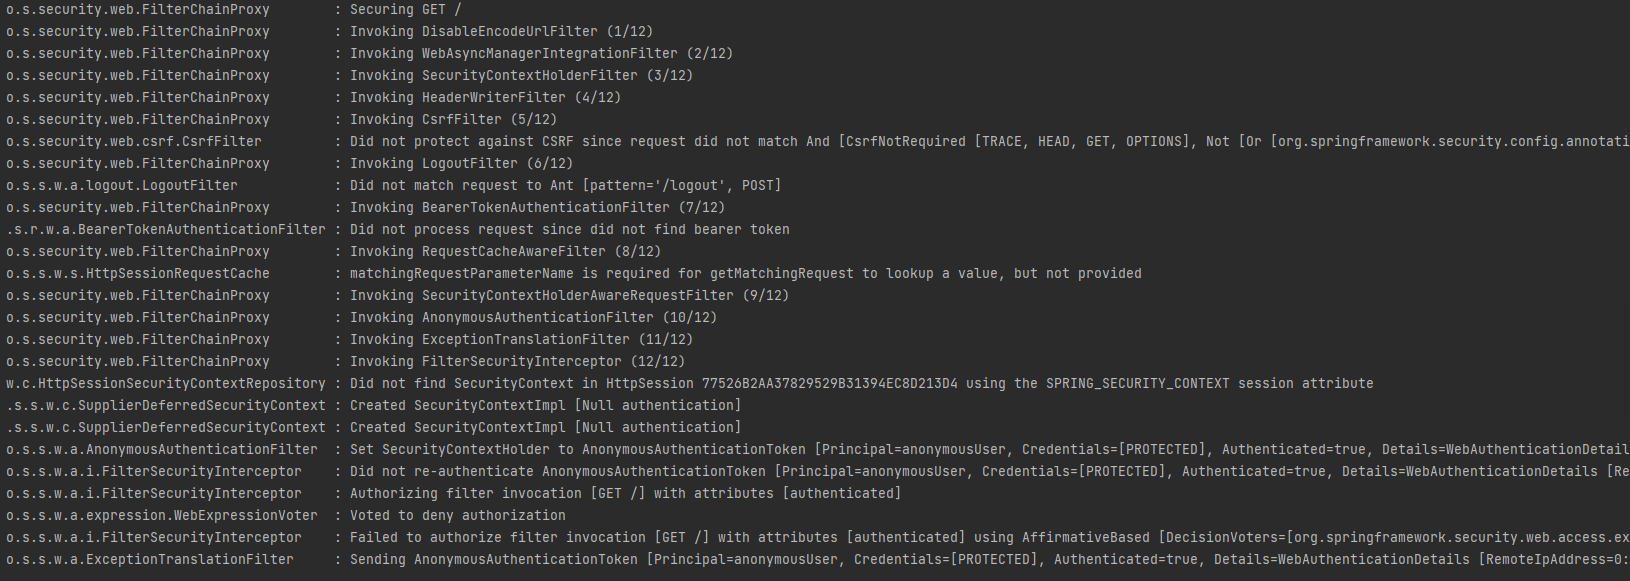
핵심 포인트는 이전 UsernamePassword 필터는 사라지고, BearerToken 필터가 그 자리를 대체한 것을 볼 수 있습니다.
개발자는 코드로 정답을 얘기해야 한다고 들었습니다.
저도 자바의 로우레벨로 들어가서 왜 이렇게 되는 지 확인해봤습니다.
이 HttpSecurity 클래스에서 힌트를 얻을 수 있었는데요.
public final class HttpSecurity extends AbstractConfiguredSecurityBuilder<DefaultSecurityFilterChain, HttpSecurity>
      implements SecurityBuilder<DefaultSecurityFilterChain>, HttpSecurityBuilder<HttpSecurity>
public HttpSecurity oauth2ResourceServer(
      Customizer<OAuth2ResourceServerConfigurer<HttpSecurity>> oauth2ResourceServerCustomizer) throws Exception {
   OAuth2ResourceServerConfigurer<HttpSecurity> configurer = getOrApply(
         new OAuth2ResourceServerConfigurer<>(getContext()));
   this.postProcess(configurer);
   oauth2ResourceServerCustomizer.customize(configurer);
   return HttpSecurity.this;
}
제가 작성한 filterChain의 코드를 클래스에서 분석해서 이 필터 체인에서 어떤 인증 필터를 사용하는 지를 정해주는 것 같았습니다.
oauth2ResourceServer {
    jwt { }
}
formLogin {
    loginPage = "/log-in"
}
실제로도 필터에 다음과 같이 로그인 관련 DSL을 변경하면 기존과 동일하게 UsernamePassword 필터가 작동함을 확인할 수 있었습니다.
Jwt 커스텀하기
이제 요구사항에 따라, Jwt Token을 해석하고, JwtTokenAuthentication 객체를 만들어 filter에 주입하면 완료입니다.
기존에는
이 Converter를 확장 커스텀하여 Filter에 등록할 계획이었습니다.
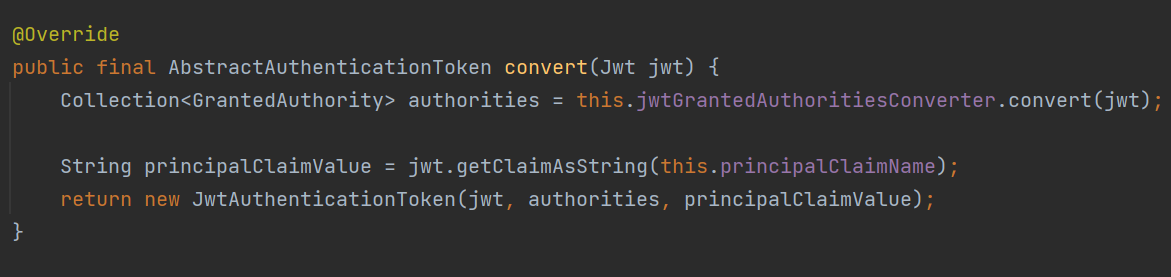
하지만 Convert가 Final로 등록돼어있어 저 JwtToken을 커스텀하는 게 어려웠습니다.
(저희 서버의 인증 객체는 Jwt Token을 디코딩해서 얻는 userId를 컨트롤러에서 필요로 했습니다.)
package uoslife.springaccount.common.security.authentication

import org.springframework.core.convert.converter.Converter
import org.springframework.security.authentication.AbstractAuthenticationToken
import org.springframework.security.core.GrantedAuthority
import org.springframework.security.oauth2.jwt.Jwt
import org.springframework.security.oauth2.server.resource.authentication.JwtAuthenticationConverter
import uoslife.springaccount.common.security.jwt.MemberJwtToken
import uoslife.springaccount.common.security.jwt.UosJwtGrantedAuthoritiesConverter

class UosJwtAuthenticationConverter : Converter<Jwt, AbstractAuthenticationToken> {
    private val uosJwtGrantedAuthoritiesConverter = UosJwtGrantedAuthoritiesConverter()

    override fun convert(jwt: Jwt): AbstractAuthenticationToken {
        return convert(jwt, uosJwtGrantedAuthoritiesConverter.convert(jwt))
    }

    private fun convert(
        jwt: Jwt,
        authorities: Collection<GrantedAuthority?>?
    ): AbstractAuthenticationToken{
        return MemberJwtToken(jwt, authorities)
    }

}
그래서 아예 Filter에서 사용할 Converter 객체를 자체적으로 제작했습니다.
Converter 인터페이스 구현 객체에선 아래 함수만 채워주면 됩니다.
그리고 UserId 변수를 추가한 MemberJwtToken과, jwt에서 권한을 추출하는 GrantedConverter를 새롭게 만들어 줬습니다.
class MemberJwtToken(jwt: Jwt, authorities: Collection<GrantedAuthority?>?) :
    JwtAuthenticationToken(jwt, authorities) {

    val userId: Long = jwt.getClaimAsString("sub")!!.toLong()
}


class UosJwtGrantedAuthoritiesConverter : Converter<Jwt, Collection<GrantedAuthority>> {

    override fun convert(jwt: Jwt): Collection<GrantedAuthority> {
        val authClaim = jwt.getClaimAsString(JwtConfig.AUTH_PAYLOAD) // "aud" 필드 추출
        val authorities = mutableListOf<GrantedAuthority>()
        val userAuthorization = removeClaimPrefix(authClaim)

        if (userAuthorization == JwtConfig.SCOPE_ACCESS) {
            authorities.add(SimpleGrantedAuthority("ROLE_ACCESS"))
        }
        if (userAuthorization == JwtConfig.SCOPE_REGISTER) {
            authorities.add(SimpleGrantedAuthority("ROLE_REGISTER"))
        }

        return authorities
    }

    private fun removeClaimPrefix(
        authClaim:String
    ):String {
        val authClaimString = authClaim.removePrefix("[").removeSuffix("]")
        return authClaimString.drop("${JwtConfig.ISSUER_PREFIX}/".length)
    }
}
마지막으로 Filter 객체에 구현 클래스를 자체적으로 주입해주면 끝입니다.
( 재사용성이 Filter 말고는 없다고 판단해, 빈으로 등록하지 않았습니다 )
            oauth2ResourceServer {
                accessDeniedHandler = JwtAccessDeniedHandler()
                authenticationEntryPoint = JwtEntryPoint()
                jwt { jwtAuthenticationConverter = UosJwtAuthenticationConverter() }
            }
# 추가적으로
Handler -> 인증은 됐지만 인가에서 막힌 경우 핸들링 (403)
EntryPoint -> 인증에서 발생한 모든 에러 핸들링 (401)
최종 결과
2024-08-25T17:29:49.055+09:00 TRACE 21080 --- [nio-8080-exec-9] o.s.s.w.a.i.FilterSecurityInterceptor    : Did not re-authenticate MemberJwtToken [Principal=org.springframework.security.oauth2.jwt.Jwt@24ef1dbd, Credentials=[PROTECTED], Authenticated=true, Details=WebAuthenticationDetails [RemoteIpAddress=0:0:0:0:0:0:0:1, SessionId=null], Granted Authorities=[ROLE_ACCESS]] before authorizing
2024-08-25T17:29:49.055+09:00 TRACE 21080 --- [nio-8080-exec-9] o.s.s.w.a.i.FilterSecurityInterceptor    : Authorizing filter invocation [GET /v2/user/me] with attributes [hasRole('ACCESS')]
최종적으로 서버에서 만든 Jwt Token을 인증 후, 이를 분석해 인가 권한(ACCESS)을 부여하는 필터를 Spring Security를 이용해 만들었습니다.
더해서 각 요청마다 존재하는 인증 객체에 저장된 userId 정보 역시 Controller에서 이용할 수 있게 됐습니다.
배운 점
JWT 인증 인가의 전반적인 흐름
라이브러리를 분석하고 커스텀하는 과정에서 소스 코드와 공식 문서 사용의 필요성
final 클래스와 함수에 대응하는 방법
Bean 등록 여부 결정
참고한 문서
OAuth2 :: Spring Security
To get started, add the spring-security-oauth2-client dependency to your project. When using Spring Boot, add the following starter: OAuth2 Client with Spring Boot implementation 'org.springframework.boot:spring-boot-starter-oauth2-client' org.springframew
docs.spring.io
Servlet Applications :: Spring Security
Spring Security integrates with the Servlet Container by using a standard Servlet Filter. This means it works with any application that runs in a Servlet Container. More concretely, you do not need to use Spring in your Servlet-based application to take ad
docs.spring.io
spring-security-samples/servlet/spring-boot/java/hello-security-explicit at main · spring-projects/spring-security-samples
Contribute to spring-projects/spring-security-samples development by creating an account on GitHub.
github.com
https://www.baeldung.com/security-spring
'스프링' 카테고리의 다른 글
| AOP로 중복 요청 제어하기 (1) | 2024.12.29 |
|---|---|
| JPA에서 처리하는 1 : N 관계 (2) | 2024.09.11 |
| 스프링과 JWT(Json Web Token) 기술을 이용한 인증과 인가 구현 (0) | 2024.08.06 |
| <인프런> 실전! 스프링 부트와 JPA 활용1 - 새로이 배운 것 (0) | 2024.07.18 |
| [Docker] SpringBoot + PostgreSql docker-compose 쉽게 하기 (0) | 2024.05.28 |